Tuesday, July 26, 2011

From Home to House.

I've been avoiding this post...


I'm not sure where to start, or even how much to say so I guess I'll just start here.


Welcome to our new temporary rental home.

Lovely isn't it?


It turns out we will be staying in the Spokane area over the winter so one of the boys can can get some medical attention.  Everyone is fine.  No death, cancer or anything like that.  Just some work in hopes of making life easier for one of the kids. 

We're really (REALLY) bummed to have to take a break from our traveling but feel VERY blessed to be able to travel right to where the best of medical specialist are.

So why have we rented a house?  We certainly didn't need to move out of the 5th wheel, it's perfect for us.  We think of it as our home.   The problem is that sometimes the close proximity of neighbors in an RV park can be difficult with a special needs child.  Nothing that's a really big deal, or anything we haven't been able to work around but since we're stuck here for such a spell we decided to look for something with more space and privacy - stretch out and make things easier because we can.

We had hoped to find some private property to park the 5th wheel on, but nothing was available like that.  So we moved on to rental properties and found this house just across the boarder from Spokane, on the western side of Idaho.  It's on a few acres, no neighbors around, a shop for Marty to tinker in, an extra room for me to craft in, hummingbirds visiting everyday, deer running through the back yard, coyotes  howling in the night and moles running amuck in the back yard - we're really enjoying it. Ok we could do without the moles, but then, they are kinda neat for us Alaskans.  Kinda.

We were picky about choosing a rental, and this place has everything we could ask for to help life run smooth while we're here.

We are not done with traveling, nor are we done with our 5th wheel.  We still plan to travel as much as possible on weekends and in between appointments.

-------------------------------------------
Our boys usually always call the 5th wheel just that, the 5th wheel.  But since we've moved out, they now call it "home".  They only refer to the rental as "the house".  Although we're in this house to make things easier for this temporary time in our lives, our hearts remain with the RV. 

As they should.  :D

Monday, July 25, 2011

Rooms for Royalty

I was recently going through old photo's and found these...

Room for a little princess.

Room for a little prince.

My uncle owns a construction company back in Indiana.  A few years ago when I flew down for a visit he took me to one of the houses he built. It was one of the show houses they made available to the public for the Parade of Homes.  In each closet there is a ladder that leads up to a reading/play loft.

The owners had requested these two custom rooms for their kids, didn't they turn out just heavenly? 

Sunday, July 24, 2011

Kefir Grains: How To's and Health Benefits.

I've been using real kefir grains for several months now to make kefir and have found the health benefits and nutritional value to be amazing.  I got mine from friends, and have sent some out to others since (you can't buy the real thing in the store).  Unfortunately they don't come with written instructions when a friend sends some to you and because I've been giving grains to more people lately, I thought I'd put a post together on what to do.

If your interested in knowing more about kefir and their health benefits I'll leave that up to the experts...
  • Patty Donovan wrote "Grow Your Own Probiotics, Part 1: Kefir" back in 2008.  Awesome article.
  • Dominic Anfiteatro has a webpage with an overload of info.  I love that he lists different probiotic strains, yeast strains, recipes, and much more. 
  • One more website has awesome recipes and further info on how to's.
So with all that out of the way, this is how it goes down...

Kefir
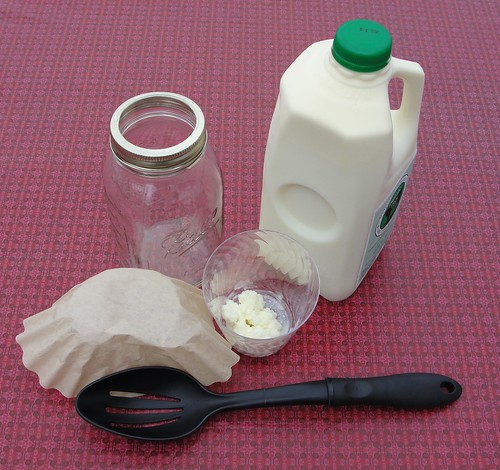
This is everything you'll need for making kefir.  Mason jars and some type of cloth or napkin (I use coffee filters) are perfect but you can use any glass or plastic container.  Some folks say there is a risk in killing the kefir grains if you use metal so I stick with glass and plastic when messing with this stuff to be safe.

SOURCE: You can either get grains from a friend who has some, or you can order them online.  You can't buy the real thing in the store though.  You CAN get a starter pack in the store, but they will die after a handful of uses and from what I understand don't have all the nutritional benefits and vitamins that the real grains have.  So however you get your Real grains, they will either come ready to go or dehydrated.

MILK VARIETIES:
  • You can use any kind of milk, but if you want your grains to continue to live and produce kefir you have to use milk from a mammal of some kind.  Cows, goats....  Whole milk is best, raw milk is even better.  I've even used the pasteurized, homogenized milk before but the health benefits go much further with better quality milk. 
  • You can even culture other types of milk such as soy or coconut milk, but use spare grains for milk that doesn't come from a mammal because the grains will eventually die off in that kind of milk. 


(And by spare grains I should add here that the grains tend to double in size about once a week.) 

ENVIRONMENTAL TEMPERATURES make a difference in the speed at which they reproduce.  The warmer side of room temperature will speed up growth of grains and kefir liquid production, the cooler side of room temperature will slow them down.  You can send the extra grains to friends, or double the health benefits by adding them to your smoothies.
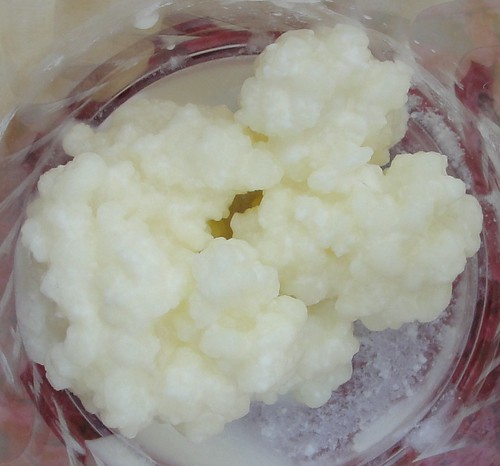
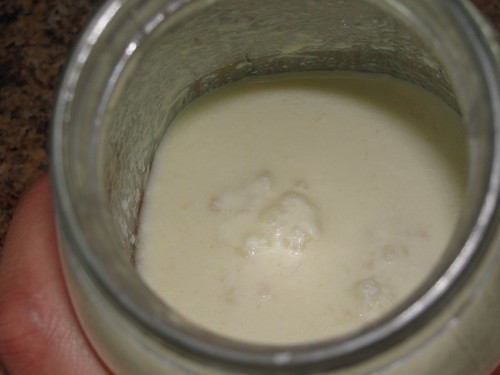

Kefir Grains
This is what real Hydrated kefir grains look like.  If yours are Dehydrated you'll want to continue milk changes daily until they start working.  It may take a few days to a week to bounce back after shipping to where it's producing liquid kefir like it should.

Kefir
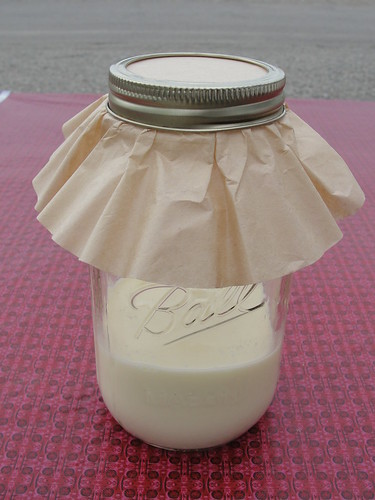
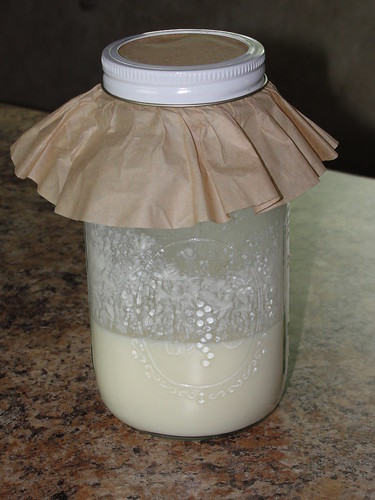
So the first thing you do with your kefir grains is put them into a jar of milk.  You'll want to give 1 to 1 & 1/2 cups of milk per tablespoon of kefir grains (I never do exact measurements).  You don't want to seal the jar because the yeast fermentation will build up pressure, which is why I use the coffee filter to cover the top of the mason jar.  The filter (or napkin) allows it to breath and yet keeps things from falling into the jar.  Use milk straight from the fridge (no need to let it warm) and store jar out of direct sunlight for 12 - 24 hours, stirring a few times a day.

Kefir
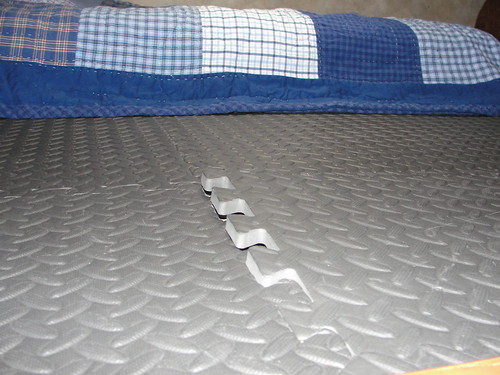
This is what it should look like after 24 hours - I just stirred it.  See how it looks above the milk line?  That's how it's suppose to look, kinda particlely and grainy.  If it isn't stirred it will build up pockets of clear liquid called kefir whey, the white will become extremely thick.  It's best to stir it so the grains don't suffocate in the thick stuff.  By stirring it, you are helping more lactose to get to the grains, which is what the grains eat and need to survive.


Kefir
This is another angle of stirred, 24 hour kefir.  The big chunks you see are the grains, as they like to float when their at their best.  The liquid kefir should look grainy or with tiny chunks after stirring it although it's hard to see here, it will also be rather like the consistency of a melted milkshake - thicker liquid than just milk.  If you leave a glass of milk out on the counter for 24 hours it does not look thick and particley like the liquid kefir does, it stays like milk and only shows a milk ring around the glass at the top of the milk line.  If your kefir stays like milk after leaving it out, better skip ingesting it until the kefir grains are turning out liquid kefir as they should.  It's pretty hard to kill your kefir grains so if they aren't working as they should, just keep changing their milk daily and they will bounce back pretty quickly.

If you are using to much milk your liquid kefir won't turn out thick or as grainy (which is ok if you want thinner consistency).

One last bit of helpful information is how to store your grains when you need a break from producing kefir, or when your going on vacation. 

I plan on adding a few more posts with recipes, ways to boost the vitamins and probiotics and hopefully stories of how this stuff can help in specific ways.  Just look for posts tagged "Kefir" which you can find by looking in the right hand column under the "Tags" heading.

Wednesday, July 20, 2011

Loft Remodel

We've been meaning to fix up the loft so LJ can have his own room, but I've really held back because safety was a big concern.  He's still so young and the loft is pretty high up.

I've been letting him play up there for months but only when I was able to keep my eyes on him without distractions.  He does wonderfully up there but I wasn't ok with him sleeping up there until we had a few things figured out.

Now that he can scale the ladder faster and with more confidence than I can, I felt we were ready to move forward. 


Two issues here.  The accordion door and the queen mattress.

Our first big problem was the door.  This photo above was taken when we first got the RV and if you look, you can see the accordion door folded away on the right side of the loft opening.  If LJ were to roll out of bed (which is rare), and roll over to the door, that little accordion door would not hold him in at all.  It is, after all just flimsy cloth.  I figured we needed a solid barrier to keep him from rolling out - and a proper door to the loft would also serve as a better sound barrier than cloth.  I really wanted to use Tambour which is what they use for roll top desks, but unfortunately that plan didn't come together so well.  We may still do it in the future but for now we just built sliding doors.

Errr...

Marty built sliding doors.

The Loft
The doors are on tracks at the bottom and top so they won't swing out.  If you roll against these puppies, their solid and won't let you fall out.  We put weather stripping on the sides and trim on the bottom to seal the light out. Actually we still need to add one last trim piece to the top on the outside here.  We also notched out holes in the trim and put magnets in the door and door frame to hold the doors closed when we're traveling down the road.  The magnets are really powerful, but LJ can still pull the doors open so that worked out really well.

The other problem was that queen bed.  Ugh, that. bed...  I really really really loathed making that bed.  If you wonder why, let me challenge you to making any bed without actually getting off the bed for 75% of the making.  And then having to do it crouched over for all 100% of the making because the head room is cut short.  LJ is just way to small for a queen bed anyway.  So we moved that mattress into the garage and stacked on top of the top bunk where it's up and out of the way.  We don't use the bunks in the garage at all, they stay lifted up against the ceiling leaving loads of room to walk around so that was a good spot for the mattress.  Should we end up needing it, it's still around.

The Loft
Next we went to Home Depot and picked up some soft puzzle flooring that doesn't hurt your knees to crawl around on.  The puzzle flooring is thin and by taking out the mattress we gained a pleasant amount of headroom up there.  Well, LJ can sit on the floor or the bed and not have to worry about hitting his head, so it's really Marty and I that are excited about more headroom up there.  We love reading stories at bedtime up there and the occasional moments of goofing off.

After the floor was finished we put his toddler mattress up there and toy box.  For added safety we put one of our video/audio baby monitor cameras up there on the door until we were able to purchase door alarm dingers.  The alarm doesn't lock him in the room, but notifies us in the middle of the night should he wake up and open one of the doors.  We are so happy with this set up and more importantly LJ is over the moon for his new space.  Even though he's been allowed to play up there for months, it was never super exciting to him until now.

I'd still like to add some extra touches, like curtains and maybe some little boy wall art, but for the most part, this is it.

I give you LJ's new room...

The Loft
The cabinets and shelf in between are just extra places to keep his toys and drive his cars on. 

The Loft

The Loft
The tote to the right is his toy box.


And here you have a small window into his imagination.  Cars, cars, cars.

Thursday, July 14, 2011

RV Modifications & Add-ons

I had to share a couple neat ideas I've seen around the RV park lately.


This is our neighbors RV.  See the pipe with the white cap?  He took some regular pvc pipe (4"?), mounted under his RV and now stores his sewer hoses in there.  Great idea, those hoses now have their own space, and can't accidentally contaminate anything else in the storage area.  Perfect.

I was thinking you could also use one for fishing rods, the tie-down bracket/rods that are suppose to go in our garage, and anything long and awkward like that.
-----------------------------------------------------------------------


Another thing I've been noticing...


These are "RV Vent Covers".  I was so excited to discover these on several of our neighbors RV's!

With no vent covers, every time it rains you have to close your vents, even if it's sweltering outside and you need that vent and fan pulling in a breeze.  And if you don't have a fantastic fan that automatically closes when it senses water, you can count on coming home to a wet floor or a wet spare bed at some point in your future.

So with the covers, you just mount them over your vents and never worry again.  EVEN if you hit the road forgetting you left your vent wide open (which I've already done since we got the covers) it doesn't hurt a thing.  Vent covers allow your fans to pull in a breeze, keeps the rain OUT, and it has screens on the vent cover in addition to the screen the vent itself already has, so you end up with a double bug barrier.

I LOVE the RV vent covers and they come at a great price.  If you don't have one for your RV, I'd highly recommend running out and picking some up.

Monday, July 04, 2011

Happy Independence Day!

Patriotic Pancakes

I busted a little food coloring out this morning and tossed it in some pancake mix, it was fun cooking and the boys loved their stack of pancakes.

We colored American flags today, had red (strawberries), white (whipped cream) and blue (blueberries) parfaits for lunch, and fire works in the middle.  It was a fun day.

Hope yours was just as special.  :D